Note: As part of a campaign where the Tyranids attacked a fortified city held by the Imperial Guard, the Guard were allowed 4D6 x 10 points of items from the Defender's Armory for the battle. They chose one Bunker, a Plasma Mine (in 2nd Squad, 1st Platoon, and a Twin-linked Lascannon Sentry Gun in Point Defense mode.
Imperial Guard Forces: Darkwing
Tyranid Forces: Tyrant

Deployment
The Forces
| Imperial Guard Forces (A Company, 1st Battalion, 1st Infantry Rgt) | Points | |
| Command Platoon: Command Squad (5) | 492 | |
| Command Platoon: Mortar Squad (6) | ||
| Command Platoon: Mortar Squad (6) | ||
| Command Platoon: Anti-Tank Squad (Lascannon) (6) | ||
| Command Platoon: Anti-Tank Squad (Missile Launchers) (6) | ||
| 1st Infantry Platoon: Command Squad (5) | 340 | |
| 1st Infantry Platoon: Infantry Squad (10) | ||
| 1st Infantry Platoon: Infantry Squad (10) | ||
| 1st Infantry Platoon: Infantry Squad (10) | ||
| 2nd Infantry Platoon: Command Squad (5) | 327 | |
| 2nd Infantry Platoon: Infantry Squad (10) | ||
| 2nd Infantry Platoon: Infantry Squad (10) | ||
| 2nd Infantry Platoon: Infantry Squad (10) | ||
| 3rd Infantry Platoon: Command Squad (5) | 343 | |
| 3rd Infantry Platoon: Infantry Squad (10) | ||
| 3rd Infantry Platoon: Infantry Squad (10) | ||
| 3rd Infantry Platoon: Infantry Squad (10) | ||
| Total Points: | 1502 | |
| Tyranid Forces | Points | |
| Mutable Hive Tyrant with Wings | 204 | |
| Mutable Hive Tyrant with Tyrant Guard (3) | 266 | |
| Warrior Brood (Rending Claws) (4) | 120 | |
| Lictors (1) | 80 | |
| The Red Terror | 104 | |
| Hormagaunt Brood with Hive Node (16) | 170 | |
| Hormagaunt Brood with Hive Node (16) | 170 | |
| Termagant Brood with Hive Node (16) | 122 | |
| Zoanthrope (1) | 59 | |
| Ripper Swarm (6) | 60 | |
| Raveners (3) | 147 | |
Total Points:
| 1502 | |

Turn 1
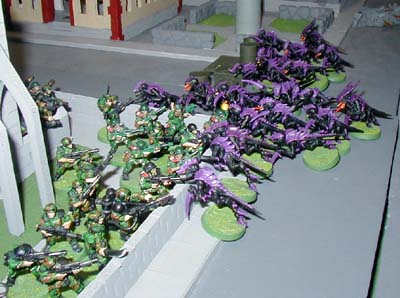
Turn 1The Imperial Guard and the Tyranids faced each other across the streets of Delos. Once the spotters at the top of the church tower declared the Tyranids to be in range, the entire company opened fire.
Two of the Lascannons fired on the Winged Hive Tyrant, wounding it once. The 3rd Lascannon, positioned in the church, fired on the Tyranid Warriors, killing one of them. The Missile Launchers in the tower of the church all fired at the Raveners, killing two out of three. The third one was finished off by the Missile launcher in 2nd Squad, 3rd Platoon (2/3). The Missile Launcher in 1st Squad, 3rd Platoon (1/3) fired at the Purple Terror, delivering 1 wound.
2nd Squad, 1st Platoon (2/1) fired on the Hormagaunt Brood on the Tyranid right, killing a pair of them. Then the two squads of mortars opened fire, both on the same Hormagaunt brood. The first squad killed five of the bugs, while the other failed to kill any at all.

The Imperial Guard Defense line
The Tyranids did not waste any time in their advance. Both broods of Hormagaunts surged forward to the center of the Imperial Guard lines. The Venom Cannon (VC) Hive Tyrant fired on the Command Squad of 2nd Platoon (C/2), killing one of them. The Winged Hive Tyrant fired on 3rd Squad, 1st Platoon (3/1), killing a pair with his Warp Blast. Both Hormagaunts Broods assaulted 2/1 like an implacable buzzsaw. The disciplined Imperial Guard stood shoulder to shoulder with fixed bayonets, and held their position. Two of the Hormagaunts were killed, impaling themselves on the guardsmen’s bayonets, but then delivered 78 attacks, 58 of which hit, 31 wounded, killing all ten members of the squad. The left Hormagaunt Brood consolidated into 1st Squad, 1st Platoon (1/1), while the right Hormagaunt Brood consolidated behind the cover of some barrels and ammunition boxes.

Turn 2
Turn 2Reloaded, the company opened fire again. Lascannon 2, on the church grounds, fired at the Purple Terror, wounding it. The Command HQ Squad (C/HQ) fired its two plasma guns at the Red Terror, finishing it off. Every unit that could fire on the Hormagaunt brood skulking behind the barrels and ammo boxes did so, and the mass of lasgun and grenade launcher fire killing all nine and wiping out the brood. It was not without cost, as the Lieutenant in the Command Squad, 1st Platoon (C/1), fired his plasma pistol. It suffered catastrophic overheating (a double 1 to hit), and he apparently was holding it close to his face (a double 1 on the saving throws), causing him to be vaporized.
Two squads attempted to fire on the Winged Hive Tyrant, but failed to injure the creature. The Missile Launcher Teams opened fire on the VC Hive Tyrant, killing one of its Tyrant Guard. Both Mortar teams and two squads concentrated their fire on the brood of Termagants, killing ten of them.
In the assault, the guardsmen of 1st Squad, 1st Platoon (1/1) sheltered behind the wall and killed a pair of Hormagaunts as they charged in. In response the Hormagaunts killed five guardsmen. The remainder held their position, and the assault continued.

The Hormagaunts plow into the front lines
The Tyranids continued to advance. The VC Hive Tyrant fired its Venom Cannon on the Missile Launcher teams up in the bell tower of the church, and killed two of the spotters. The Zoanthrope fired a Warp Blast at Command Squad, 2nd Platoon (C/2), standing on the steps of the church, but missed.In the assault of the Hormagaunts vs. 1/1, the guardsmen killed one gaunt, but all five were killed in return. The Hormagaunts consolidated into the nearest squads—the Command Squads of 1st and 2nd Platoon. The Winged Hive Tyrant entered the fray, assaulting 3/1. The guardsmen, terrified, were unable to wound the monstrous creature, while the Tyrant killed three of them. The rest attempted to flee, and were slaughtered by the Hive Tyrant, who then consolidated into 3rd Squad, 2nd Platoon (3/2).

Turn 4
Turn 3The Lascannon Sentry gun on the Imperial Guard’s right flank was finally able to target something—the Ripper Swarms inside a nearby building. However, the cover of the building protected the little bugs from its fire. 2nd Squad, 2nd Platoon (2/2), 1/2, and 1/3 fired on the Termagants, and while 2/2 did nothing, 1/2 killed one, and 1/3 killed the last five. Lascannon 1, on the bunker roof, and the Missile Launchers in the church tower fired on the VC Hive Tyrant and his Tyrant Guard. The Lascannon failed to wound while the Missile Launchers killed the last Tyrant Guard with a pair of Krak Missiles.
Command Squad, 3rd Platoon (C/3) fired its Grenade Launchers at the Ripper Swarms, and killed two bases’ worth. 2/3 fired its Missile Launcher at the Tyranid Warriors to failed to inflict any harm on them. The 2nd Mortar Team’s mortar shells also failed to dislodge the Warriors. Mortar Team 1 fired at the VC Hive Tyrant, but failed to do any damage to it. Lascannon Team 2 killed the Zoanthrope with a well placed shot.
In the assault, 3/2 lost two men to the Hive Tyrant while failing to injure it, but the remaining guardsmen held their ground. The Hormagaunts, fighting against C/1 and C/2, lost four gaunts to the guardsmen, while killing two from C/2. Under synapse control bolstered by a Hive Node, the gaunts were not leaving anytime soon.
After tearing apart one squad, the Hormaguants attack others
The VC Hive Tyrant fired its Venom Cannon at Lascannon 1, on the roof of the bunker, and despite the protection the bunker gave them, both crewmen perished, putting the weapon out of action. In the assault, the Winged Hive Tyrant killed another pair of guardsmen, and the guardsmen turned to flee, only to be killed by the Tyrant, ripping their bodies apart with all the emotion of a chef carving a turkey. The Hormagaunts killed two guardsmen, while the guardsmen killed three Hormagaunts in return. Steadily the gaunt assault was petering out.

Turn 4
Turn 43/3 and Lascannon 2 missed the last warrior, 1/2 wounded it, and Mortar Team 1 finished it off. 1/3, Lascannon 3, the Lascannon Sentry Gun, Mortar Team 2, and the Missile Launcher Team all concentrated their fire on the VC Hive Tyrant, and all of them failed to wound it. 2/2 fired on the Ripper Swarms in the buildings, and delivered 2 wounds.
In the assault, the Hormagaunts killed four guardsmen, while the guardsmen killed three gaunts in return, and the combat continued. The Ripper Swarms charged 2/2, killing a single guardsman, who failed to hurt any of the rippers in return. The guardsmen in the church finally wiped out the Hormagaunts, and consolidated their position.

Turn 5
Turn 53/3 and Lascannon 2 missed the last warrior, 1/2 wounded it, and Mortar Team 1 finished it off. 1/3, Lascannon 3, the Lascannon Sentry Gun, Mortar Team 2, and the Missile Launcher Team all concentrated their fire on the VC Hive Tyrant, and all of them failed to wound it. 2/2 fired on the Ripper Swarms in the buildings, and delivered 2 wounds.
In the assault, the Hormagaunts killed four guardsmen, while the guardsmen killed three gaunts in return, and the combat continued. The Ripper Swarms charged 2/2, killing a single guardsman, who failed to hurt any of the rippers in return. The guardsmen in the church finally wiped out the Hormagaunts, and consolidated their position.

Turn 6
Turn 6C/HQ, 1/2 and 3/3 fired on the Lictor, which was protected inside a building. 1/2 wounded it once, but they were unable to dislodge it. The rest of the army who were able focused on the VC Hive Tyrant, the last major threat. The Lascannon Sentry Gun missed, Lascannon 3 wounded it, and the combined Missile Launchers of 2/3 and 1/3 brought it down. At this point the remaining Tyranids conceded and fled the battlefield, leaving the area in the control of the Imperial Guard.
Darkwing: When Tyrant picked the deployment zones, I thought I was screwed. My deployment corner had only a single building to use for cover, while the Tyranid corner had plenty of cover in which to advance. I placed my bunker on my left flank, and my twin-linked lascannon sentry on my right flank, set to point-defense mode.
As planned, I deployed my mortars to the rear, and split up my lascannon squad into three fire teams. The top of the church tower proved to be an ideal location for my missile launchers, as all three could fit up there and have an excellent field of fire. My infantry squads then piled into all the open space I find, behind the church’s exterior wall, and within the church itself. My flamer squads up front, my Missile Launchers and Grenade Launchers to the middle and rear.
I was also fortunate to get the first turn. While my short and medium range firepower were essentially out of range by default, my Heavy Weapons teams weren’t. I was lucky to be able to take out all three of Tyrant’s Raveners in the first turn, as well are hurt a unit of his Hormagaunts and injure one of his Tyrants—I wasn’t having the bad luck that my Eldar army had against the Tyranids in Cityfight. The sheer volume of firepower I was able to put out helped too.
Predictably the Hormagaunts charged my front lines in the first turn, which prevented me from using my Plasma mine, and my squad was wiped out. My Close Order Drill was paying me back in dividends, as well as being in cover when attacked, as it allowed my guardsmen to get in a kill or two against the gaunts before being killed. This eventually let me whittle them down to nothing by the end of the game. The Sharpshooters skill also helped immensely, allowing me to kill a lot more Tyranids than I ordinarily would be able to. In retrospect, I felt stupid in getting Frag Grenades for all of my units, seeing as I was thinking it was a defensive advantage, rather than offensive advantage in assault. The Close Order Drill and my being in cover most of the time had the desired effect without the Frag Grenades. Whoops.
The sheer number of blast weapons in my army also helped tremendously—between the Missile Launchers, Grenade Launchers, and Mortars, I believe I had over twenty of them. In Cityfight, Ordnance Blast and template weapons might be considered underpowered, doing D6 hits (as there’s a good chance you’ll roll a 1 or 2 and feel cheated, as in a normal battle they’ll likely do at least twice that. Blast weapons, on the other hand, are very good, since you’ll average two hits, whereas in a normal battle you’d be lucky to get more than one, since you have to center the marker hole over a model and most players spread their models out a bit.
I had considered taking Vox Casters for all my units, but luckily I remembered that in the densely packed Cityfight, all my units were likely to be within 12” of some officer, therefore negating the need for all those radios. The points cost saved went to getting me the Sharpshooters skill for my heavy weapons teams and my command squads.
In the end I’m also glad I got a pure infantry force—a Leman Russ or two would have been nice, but any of the big Tyranids can rip one apart with ease, and I don’t think they would have earned their points back before being destroyed. Why get a tank when you can get the equivalent of 2-3 guard squads, each with a heavy weapon. In this situation, the infantry is more survivable.
In the end, my firepower carried the day. I was at first worried that I wouldn’t be able to kill enough of Tyrant’s force to allow me to advance and claim some buildings, but luckily I was able to, and snatch two quarters in the last turn turns of the game.
No comments:
Post a Comment